Read more about dedicated sensors using PowerShell for VM/LXC monitoring here
Part 1: Install and Configure SNMP on Proxmox
Part 2: Configure PRTG to Monitor Proxmox
Part 3: Special Considerations for PRTG Running as a Proxmox VM
This guide explains how to configure Proxmox to be monitored by PRTG Network Monitor using SNMP (while running within a VM in Proxmox). It covers SNMP installation, configuration, and firewall rules required for successful monitoring.
Prerequisites
- Proxmox VE server (this guide uses IP
10.0.0.1as an example) - PRTG Network Monitor server (this guide uses IP
10.0.0.40as an example) - SSH access to your Proxmox host
- Administrative access to PRTG
Note: Replace the IP addresses in this guide with your actual Proxmox and PRTG server IPs, in case of Remote Probes use the Remote Probe’s IP address.
Part 1: Install and Configure SNMP on Proxmox
Step 1: Install SNMP daemon
Connect to your Proxmox server via SSH (or use the build-in “Shell” Button in the GUI from your node) and run:
apt-get update
apt-get install snmpd
Step 2: Backup the original configuration
cp /etc/snmp/snmpd.conf /etc/snmp/snmpd.conf.backup
Step 3: Configure SNMP
Edit the SNMP configuration file:
nano /etc/snmp/snmpd.conf
Delete all existing content or and replace with / modify your original:
# System Information
sysLocation    Your Location Here
sysContact     Your Name <your@email.com>
sysServices    72

# Agent Operating Mode
master  agentx
agentaddress udp:161

# Access Control
view   allview    included   .1

rocommunity  public 10.0.0.40 -V allview
rocommunity  public 127.0.0.1 -V allview
Important configuration notes:
agentaddress udp:161– SNMP listens on all interfaces on port 161rocommunity public 10.0.0.40 -V allview– Allows your PRTG server read-only access to all SNMP datarocommunity public 127.0.0.1 -V allview– Allows local testing- If your sensor is running on a Remote Probe, you need to adjust the IP from the PRTG Server to the PRTG Remote Probe Server.
Save and exit:
- Press
Ctrl+Oto save - Press
Enterto confirm - Press
Ctrl+Xto exit
Step 4: Restart and enable SNMP
systemctl restart snmpd
systemctl enable snmpd
Step 5: Verify SNMP is running
systemctl status snmpd
You should see “active (running)” in the output.
(Optional) Step 6: Test SNMP locally
Install SNMP utilities for testing:
apt-get install snmp
Test the SNMP connection:
snmpwalk -v2c -c public 127.0.0.1 .1.3.6.1.2.1.1
You should see system information including your hostname and location.
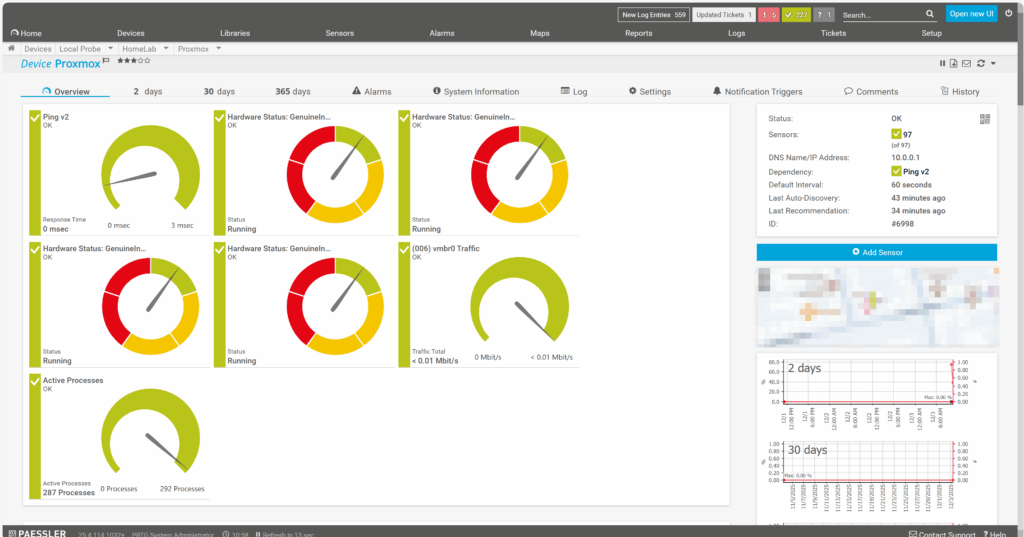
Part 2: Configure PRTG to Monitor Proxmox
Step 1: Add Proxmox as a device
- Log in to your PRTG web interface
- Navigate to Devices → Add Device
- Enter the following:
- Device Name: Your Proxmox hostname (e.g.,
Proxmox-S01) - IP Address/DNS Name:
10.0.0.1(your Proxmox IP)
- Device Name: Your Proxmox hostname (e.g.,
- Click OK
Step 2: Configure SNMP settings
- Go to the device settings
- Under SNMP Settings, configure:
- SNMP Version: v2c
- Community String: public
- Save the settings
Step 3: Add sensors
Option A: Auto-Discovery
- Right-click on the device
- Select Auto-Discovery
- PRTG will automatically find available SNMP sensors
Option B: Manual sensor addition
- Right-click on the device
- Select Add Sensor
- Search for SNMP Library
- Select Basic Linux Library (UCD-SNMP and LM-SENSORS MIB)
Recommended sensors
After discovery or manual addition, you should have sensors for:
- SNMP CPU Load – Monitor processor usage
- SNMP Memory v2 – Track RAM utilization
- SNMP Disk Free v2 – Monitor storage capacity
- SNMP Traffic v2 – Track bandwidth on network interfaces
- SNMP Uptime v2 – Monitor system availability
Part 3: Special Considerations for PRTG Running as a Proxmox VM
If your PRTG server runs as a VM on the same Proxmox host you want to monitor, additional firewall configuration may be required.
If you have the Proxmox firewall enabled, you need to allow SNMP and ICMP traffic from your PRTG server.
Step 1: Check firewall status
pve-firewall status
If the firewall is disabled, you can skip to Part 3.
Step 2: Configure host firewall rules
more info in Step 4
Edit the host firewall configuration:
nano /etc/pve/nodes/YOUR_NODE_NAME/host.fw
Replace YOUR_NODE_NAME with your actual Proxmox node name (e.g., S01).
Add the following rules under [RULES]:
[RULES]

IN ACCEPT -source 10.0.0.40 -p udp -dport 161 -log nolog
IN ACCEPT -source 10.0.0.40 -p icmp -log nolog
IN ACCEPT -source 10.0.0.0/24 -p tcp -dport 8006 -log nolog
IN ACCEPT -source 10.0.0.0/24 -p tcp -dport 22 -log nolog
Rule explanations:
- UDP 161 – Allows SNMP traffic from PRTG
- ICMP – Allows ping from PRTG (for connectivity checks)
- TCP 8006 – Allows Proxmox Web UI access from your network
- TCP 22 – Allows SSH access from your network
Save and exit (Ctrl+O, Enter, Ctrl+X).
Step 3: Reload the firewall
pve-firewall reload
Troubleshooting
SNMP connection timeout
- Verify SNMP is running on Proxmox CLI:
systemctl status snmpd - Check SNMP is listening on Proxmox CLI:
ss -ulnp | grep 161 - Test locally on Proxmox CLI:
snmpwalk -v2c -c public 127.0.0.1 .1.3.6.1.2.1.1 - Use the free Paessler PRTG SNMP Tester for troubleshooting from PRTG Server. (Manual)
Security Recommendations
- Change the community string – Replace
publicwith a unique, complex string in both the Proxmox SNMP config and PRTG device settings - Restrict access by IP – Only allow your PRTG server’s IP address in the SNMP configuration
- Consider SNMPv3 – For enhanced security, consider using SNMPv3 with authentication and encryption
- Limit firewall rules – Only open the ports that are absolutely necessary
Quick Reference
Files to configure:
- SNMP configuration:
/etc/snmp/snmpd.conf - Host firewall:
/etc/pve/nodes/NODENAME/host.fw - Cluster firewall:
/etc/pve/firewall/cluster.fw
Key commands:
- Restart SNMP:
systemctl restart snmpd - Check SNMP status:
systemctl status snmpd - Reload firewall:
pve-firewall reload - Stop firewall (testing):
pve-firewall stop - Start firewall:
pve-firewall start
PRTG sensor to use: SNMP Library → Basic Linux Library
Leave a Reply